Lesson Plans for Elementary School Students
Full Length Lesson Plans from an Elementary School Teacher
Art Lesson Plan: Ripped Paper Art – Snowmen, Mountains and Evergreens

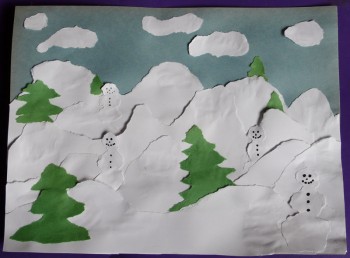
This art lesson is easy enough for grades 1 and 2 but can be adapted for other grades as well. A huge amount of learning goes on in this lesson. Students learn about depth, foreground, middleground, and background, as well as horizon line. We talk about shape and form of snowmen, mountains, trees, and clouds, and we rip the paper to make curved, jagged, wavy lines. The resulting pictures are amazing.
Objectives:
- learn about foreground, middleground and background
- learn how to create depth in their picture
- understand some elements of design: line (jagged, curved, straight, wavy), shape and form (organic shapes and forms of familiar objects (clouds, mountains, trees, snowmen), and space (depiction of objects in the distance as smaller and closer to the top of the art paper and spaces around shapes or objects, shapes and lines closer together or farther apart
- learn about a horizon line
Materials:
- light blue 11″ X 18″ sheet of paper (everything gets glued on here)
- 1-2 sheets of white paper 11″ X 18″ and other scraps of white paper (need lots of white paper scraps for mountains, snowmen, and clouds)
- scraps of green paper (trees)
- white glue
- pencils
Method:
- Show students how to “make” their pictures. Draw 2 or 3 ranges of mountains across the width of the white paper with the pencil. Rip carefully along the pencil mark. Flip over the white paper and arrange them on top of the blue paper, leaving some blue sky background.
- With your pencil, draw at least one small (big enough to rip out), one medium, and one large snowman. Rip carefully along the pencil mark. Flip over and arrange the snowmen in the foreground, middleground, and background. Talk about how things in the background look smaller, and get larger as you move to the foreground.
- Now draw at least one small (big enough to rip out), one medium, and one large evergreen tree with your pencil. Rip carefully along the pencil mark. Flip over and arrange the tree in the foreground, middleground, and background. Talk about how things in the background look smaller, and get larger as you move to the foreground.
- Talk about the horizon line and how the sun rises and sets there. Talk about the word “horizontal” and how it runs the same direction as the horizon line.
- Draw or just rip out several large and small clouds to arrange in the sky.
- When the mountains, snowmen, and evergreens are arranged on your light blue background sheet, you may begin to glue them on. (Make sure the only blue that is showing is above the snow, in the sky.)
- Students may now make their pictures. Remind students to put their names at the bottom of their picture, or on the back.
Tags: background, christmas, depth, elements of design, foreground, horizon line, horizontal, middleground, shape and form, space, winter
