Lesson Plans for Elementary School Students
Full Length Lesson Plans from an Elementary School Teacher
Art Lesson Plan: Joseph Stella Art: Line Designs
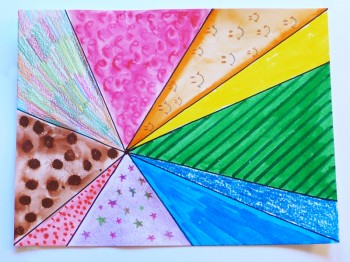
 This lesson is great fun and looks impressive when complete! Students get to use a great variety of art mediums after drawing many line segments from a focal point. We also discuss and learn about the elements of design.
Learning Objectives:
- Learn about different artists and imitate work of different artists
- Talk and learn about 5 elements of design: lines, shapes, mass, texture, and color, “line” and “space” especially, because of their value to Stella.
- Draw straight lines. Talk about “precision” which is accuracy, and how important it is in measuring, and drawing straight lines.
Materials:
- write-up for bulletin board, to be posted with students’ art: “Joseph Stella 1880-1946 Abstract. He was born in Italy but grew up in the United States. He uses lines and mixed media in his artwork. He used lines and spaces. He didn’t think you should paint the object or the figure, but the shape and atmosphere around an object. He tried to sow movement through repetition of an image. He liked geometric precision.”
- for all students: paper, black marking pen, rulers, paints (some thick for “texture” and others thinner, brushes, pencil crayons, pastels, coloured chalk, crayons, thick black tempra paint
- towels and bin/sink of warm water for cleanup of desks
- title for bulletin board, on paper: “Line Designs by Grades 1 and 2”.
Method:
- Draw a black dot somewhere on the white paper. It doesn’t have to be in the centre, off to one side looks great too. All lines will converge here (come to a point here).
- Using a ruler, draw straight lines from the edge of the paper to this dot, 3 to 12 lines (10 looks great), so they look like rays of light spreading outwards. Vary the width of the spaces between each line; make each different. Stress STRAIGHT lines for framing each section. Inside lines can be wavy or straight.
- “Colour” some “spaces” in with chalk, others with crayons, filling in between 2 lines with diagonal “lines”, or swirls, or continuous swiggles with pencil crayons, or paint drops splattered (cover the rest of the page with newsprint, leaving only the space between the 2 lines open for painting, so the splatters are contained in that one area). Cover the rest of the art work when pastels are used as well, because fingers get smeared with them. Have students use pastels last, then immediately wash their hands after, so art work is not smeared. Space between 2 lines can be painted solid, or different size dots can be painted or drawn, zigzag “lines” drawn, etc. so that each “space” is different. STRESS “elements of design”….”colour”…”lines”…”spaces”…”texture”…”mass”.
- Using a thin brush and the thick, black paint, re-draw the black lines, making them stand out to separate the sections clearly. Be careful to keep the lines STRAIGHT. Paint SLOWLY and CAREFULLY.
- Put art somewhere safe to dry. Students clean brushes and use towels and soapy water to clean off desks.
- On the bulletin board, post students’ artwork when dry, with Stella’s artist blurb (from Materials section above), title “Line Designs by Grades 1 and 2”, and the learning objectives (listed above) for parents to see.
Tags: any grade art, Art, drawing, lines, math shape characteristics, measuring, shapes, straight lines
