Lesson Plans for Elementary School Students
Full Length Lesson Plans from an Elementary School Teacher
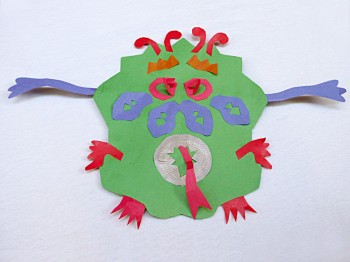
Health and Nutrition Lesson Plan: Making Germ Monsters

I do this lesson at the beginning of the year. It’s a really fun art activity and reminds students to cover their mouths when they cough or sneeze and to use their inner elbows, not their hands, to prevent the spread of germs.
Objectives:
- learn healthy living habits: the importance of washing hands, and covering sneezes and coughs by using your inner elbow, not your hands, to prevent the spread of germs
- learn about symmetry
Class Management:
- Before class, teacher places a small piece of masking tape with a number on each student’s desk. The number is either a 1, 2, 3 or 4. When the teacher calls out the number “1”, those students might help pass out the glue bottles to everyone, and collect them after the lesson. Students with a number “2” printed on their desk might be asked to pass out a sheet of newspaper to each student, so that they may cover their desktop. Number “3’s” might be asked to hand out the scissors, and collect them after the lesson. Number “4’s” could hand out small boxes of scrap art paper, and collect them after the lesson.
- All students can print their names on the back of their “germ monsters” and bring them over to the teacher for stapling on the bulletin board, when they are finished.
- All students can throw away their scrap art paper and used newspaper from their desk area, when they are finished.
- All students can put reusable paper back in the scrap art paper boxes.
Materials:
- variety of scrap art paper in different colors
- newspapers
- white glue
- scissors
- title for bulletin board, on paper: “Germ Monsters by Grades 1 and 2”, together with learning objectives (listed above) for parents to see
- Picture book: Germs!Germs!Germs! by Bobbi Katz, a Cartwheel book.
Method:
- Introduce germs by reading a story about germs like the book “Germs!Germs!Germs! by Bobbi Katz
“. It is a Cartwheel Book.
- Talk about germs and how they are passed around and how they can make people sick. Talk about how to get rid of germs (washing hands) and how to prevent passing on germs to others (cough into your elbow, not your hand).
- Now tell students that they will be making their own germ monsters. Look at the pictures in the book quickly and talk about what the germs look like in the book. There are millions of germs and they can all LOOK different, just like the germs they are going to make. They may make more than one germ monster if they wish.
- Show them symmetry: Fold and cut paper for germ body (any shape). Open the paper, explaining to students that both sides are the same. They are symmetrical.
- Put several small pieces of paper together. Show students how to hold the papers together so you can cut out identical shapes. Cut out a simple arm or leg shape. Separate the shapes. Show students that they are the same. Ask if both sides are symmetrical. Yes they are. Show students how you glue the arms or legs on your germ, so that they are symmetrical. (I do the legs like a ladybug, so it’s a little familiar.) Do the leg placement wrong once (not placed identically) and ask students if they are symmetrical. No, they’re not. The sides are not the same. Then fix the legs so both sides are symmetrical. (Here’s an easy way to attach 2 pieces symmetrically. Glue one piece to body, then fold body in half so the one attached piece is touching the spot where the second piece needs to be attached. When the second piece is attached, it sits on top of the first piece when the body is folded in half. The two pieces that are attached symmetrically are now on top of each other. If the two pieces are to be placed symmetrically ON the body, glue on one piece, put the second one ON TOP of the first, with glue on it’s top, fold over the body so that the glue sticks to the body. When you open the body, the 2 pieces are spaced correctly.)
- Put several more small pieces of paper together. Cut out simple antennae. Attach some correctly (symmetrically) and others incorrectly (not symmetrically/asymmetrically). Keep asking students if you did it symmetrically. Are both sides the same?
- Fold a small paper. Cut out a mouth. Are both sides the same? Yes. When both sides are the same, what is that called? Yes, they are symmetrical.
- Add eyeballs, wings, spikes, spots. Continue until all students understand the meaning of symmetry: both sides are the same. They are identical.
- Have students cover their desks with newspaper, and hand out the glue, scissors, paper. (See method above in Class Management)
- Students can work alone at their desk or group their desks together in 4’s. I like groups better because they share ideas and build upon each other’s ideas. Also, because it it the beginning of school, they chat together and get to know each other a little better.
- During the lesson, after students have begun making their germ monsters, ask students to take a “walkabout” to look at other student’s work, to share ideas. Students can go look at other “germ monsters”, then go back to their own, and add new ideas.
Tags: Art, covering sneezes, germ prevention, hygiene, Math, symmetry, washing hands
